In this second part of the input tutorials, we are going to look at handling input on a mobile device. We are going to cover:
- Configuring the RemoteInput plugin in vForge
- Connecting with an Android device
- Handling touch
- Handling acceleration
This tutorial is fairly short, as once you’ve got RemoteInput up and running, most of the rest is pretty similar to stuff we have already covered, as you will soon see.
One major gotcha with working with a mobile device is emulating touch and motion control on your PC. Fortunately Project Anarchy offer a good solution, RemoteInput.
RemoteInput
RemoteInput allows you to use an Android device to control your game in vForge. This can result in a massive time savings, since you dont have to deploy your application to device to make use of the controls.
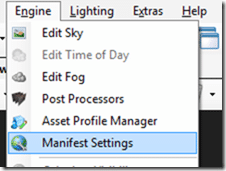
First though, you need to enable the plugin. To enable the plugin, in vForge select Engine->Manifest Settings.
Then select the Engine Plugins tab
Then click Add Plugin
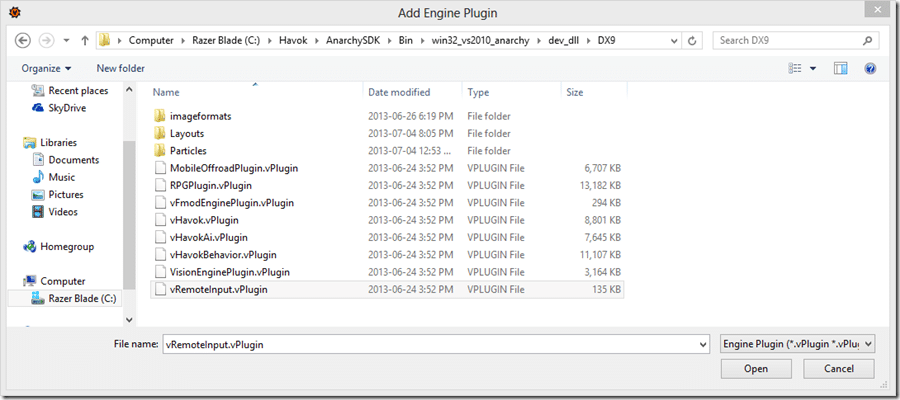
Then locate the vRemoteInput plugin, mine was located at C:HavokAnarchySDKBinwin32_vs2010_anarchydev_dllDX9.
You will now be prompted to reload your project, do so.
Next you need to add a small bit of code to your project.
G.useRemoteInput = true function OnAfterSceneLoaded(self) if G.useRemoteInput then RemoteInput:StartServer('RemoteGui') RemoteInput:InitEmulatedDevices() end end
This code needs to be called before any of input is handled, I chose OnAfterSceneLoaded(), but there are plenty of other options earlier along that would have worked. Of critical importance to notice is the global value, G.useRemoteInput, you need to set this to true if you are going to be using the RemoteInput plugin. Next we start the server up with a call to StartServer() passing in an (arbitrary) string identifier. We then initialize things with InitEmulatedDevices() which to be honest, I don’t know why you would ever defer this, so why not just do this in StartServer? Anyways… you need to call the init function. You are ready to use RemoteInput.
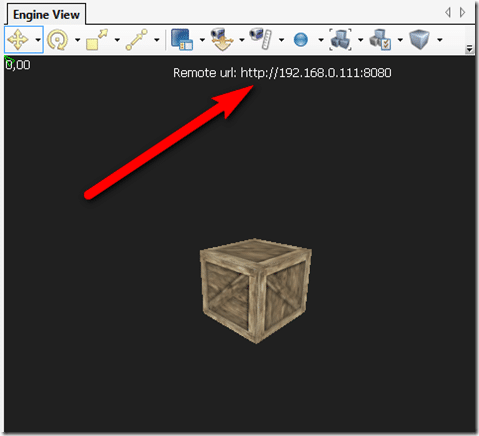
Next time you run your app with the newly added code you will see:
Now on your Android device, open the web browser and enter the URL listed at the top of your app. Once loaded, you can touch on screen and it will be sent to vForge as local input. Motion data is also sent, allowing you to use the accelerometer and multi-touch without having to deploy to an actual device. If you change the orientation of the device, it updates in vForge. One thing to keep in mind, the coordinates returned by RemoteInput are relative to the window size on screen, not those of your actual device.
There are a few things to be aware of. First, your computer and mobile device both need to be on the same sub-net… so both connected to the same wireless network for example. Next, it doesn’t require a ton of speed, but as I type this connected to a cafe internet hotspot made of bits of string and a couple tin cans… on a slow network it’s basically useless. Also, you may need to reload your browser on occasion to re-establish the connection. Finally, the browser may not support motion data, for example the stock browser on my HTC One works fully, but the Chrome browser does not.
Handling mobile input using Lua
Now we are going to look at how you handle touch and motion controls. The code is virtually identical to the input code from the previous tutorial so we wont be going into any detail on how it works.
Handling Touch:
-- in the function you create your input map: local w, h = Screen:GetViewportSize() self.map:MapTrigger("X", {0, 0, w, h}, "CT_TOUCH_ABS_X") self.map:MapTrigger("Y", {0, 0, w, h}, "CT_TOUCH_ABS_Y") -- in the function where you handle input: local x = self.map:GetTrigger("X") local y = self.map:GetTrigger("Y") -- Display touch location on screen Debug:PrintLine(x .. "," .. y)
This code is taken from two sections, the initialization area ( probably where you init RemoteServer ) where you define your input map, and then in the function where you handle input, possibly OnThink(). It simply displays the touch coordinates on screen. You can handle multiple touches using CT_TOUCH_POINT_[[N]]_X/Y/Z, where [[N]] is the 0 based index of the touch. So for example, CT_TOUCH_POINT_3_X, would give the X coordinate of the 4th touching finger, if any.
Handling Acceleration:
-- in the function you create your input map: self.map:MapTrigger("MotionX", "MOTION", "CT_MOTION_ACCELERATION_X") self.map:MapTrigger("MotionY", "MOTION", "CT_MOTION_ACCELERATION_Y") self.map:MapTrigger("MotionZ", "MOTION", "CT_MOTION_ACCELERATION_Z") -- in the function where you handle input: local motionX = self.map:GetTrigger("MotionX") local motionY = self.map:GetTrigger("MotionY") local motionZ = self.map:GetTrigger("MotionZ") Debug:PrintLine(motionX .. "," .. motionY .. "," .. motionZ)
As you can see, motion and touch are handled virtually identical to other forms of input. The value returned for MOTION values is the amount of motion along the given axis, with the sign representing the direction of the motion.


