Alright, this one has absolutely nothing to do with game development, not even remotely, just an upfront warning!
I post it here because I just spent the last several hours trying to figure this out and now that I solved it, I felt like sharing in case other people are trying to add a property or attribute to a BlogEngine.Net page. It’s not hard, once you figure it out! Anyways, this site is run on BlogEngine and I am rather happy with it. I have another site I am working on, however I need much more static pages with searchable attributes. This isn’t really something Blog Engine is designed to do out of the box. You can of course add tags to blog posts, but that doesn’t really work well for non-chronological pages.
So, I added it to the page object itself. In this case I am going to add a single new entity to the Page, Published Year. First obviously you need the BlogEngine source code, download the source release. Extract the project then open BlogEngine.sln inside the BlogEngine folder in Visual Studio.
First, in BlogEngine.core, locate Page.cs.
Now add the following code:
/// <summary> /// Added by me to support published year /// </summary> private string publishedYear; /// <summary> /// Gets or sets a value indicating Published Year /// </summary> public string PublishedYear { get { return this.publishedYear; } set { base.SetValue("PublishedYear", value, ref this.publishedYear); } }
Now you need to add a GUI for it, so you can actually set the Published Year.
Open EditPage.aspx. First lets add the html. I put it so it will appear in the side area of the form, above keywords. Locate the Keywords LI ( included below for reference ) and add the following method:
<li> <label class="lbl" for="<%=txtPublishedYear.ClientID %>">Published Year</label> <asp:TextBox runat="server" ID="txtPublishedYear" TextMode="SingleLine" /> </li> <li> <label class="lbl" for="<%=txtKeyword.ClientID %>"><%=Resources.labels.keywords %> </label> <asp:TextBox runat="server" ID="txtKeyword" TextMode="MultiLine" Rows="5" /> </li>
Also in EditPage.aspx locate the SavePage() javascript method, and change it as follows:
var publishedYear = $("[id$='txtPublishedYear']").val(); var dto = { "id": Querystring('id'), "content": content, "title": title, "description": description, "publishedYear": publishedYear, "keywords": keywords, "slug": slug, "isFrontPage": isFrontPage, "showInList": showInList, "isPublished": isPublished, "parent": parent };
Order IS important here.
Now open EditPage.aspx.cs. Locate the PindPage() method and add:
this.txtPublishedYear.Text = page.PublishedYear;
Now locate BtnSaveClick() and modify to look like:
page.Description = this.txtDescription.Text; page.Keywords = this.txtKeyword.Text; page.PublishedYear = this.txtPublishedYear.Text; if (this.cbFrontPage.Checked)
Finally open AjaxHelper.aspx.cs in the admin folder. Locate the SavePage() method and make the following change:
public static JsonResponse SavePage( string id, string content, string title, string description, string publishedYear, string keywords, string slug, bool isFrontPage, bool showInList, bool isPublished, string parent)
Remember when I said order was important? These parameters need to be in the same order as the dto object created earlier. So make sure your publishedYear setting is in the same position in both. Now scroll down a little further in the SavePage() method and make the following change:
page.Description = description; page.PublishedYear = publishedYear; page.Keywords = keywords;
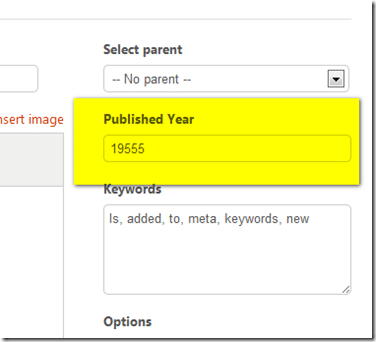
And, you are now done. Compile and run. Now when you go into your Page admin um, page, it should look like this:
Yay! May seem a small thing, but its incredibly useful for me, and hopefully will be helpful to some of you out there!
Totally Off Topic

