Eclipse has this annoying habit of using the JRE instead of a JDK you have installed. It isn’t immediately obvious what is happening until you attempt to build a project. For example, I just move some PlayN source to a new laptop and when I try to compile I get:
[ERROR] Failed to execute goal on project tictactoe: Could not resolve dependencies for project com.gamefromscratch:tictactoe:pom:0.0.1-SNAPSHOT: Could not find artifact com.sun:tools:jar:1.6 at specified path C:Program Files (x86)Javajre6..libtools.jar -> [Help 1]
[ERROR]
Which can be a bit of a head scratcher if you haven’t been bit by it before, but there error is exactly right, the JRE unlike the JDK doesn’t have everything installed, including the aforementioned tools.jar. Fortunately the fix is quite simple.
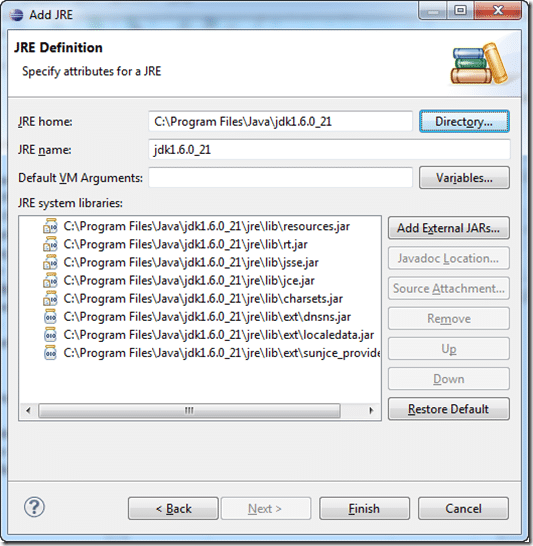
In Eclipse, select the Window menu->Preferences. Then select Java->Installed JRE’s. Then click Add… select Standard VM then click Next. In the JRE home, navigate to the folder you’ve installed the JDK to ( c:Program FilesJavajdk1.6.0_21 in my case ). It will now churn away for a while. After a few seconds, it should look like this:
Now click Finish.
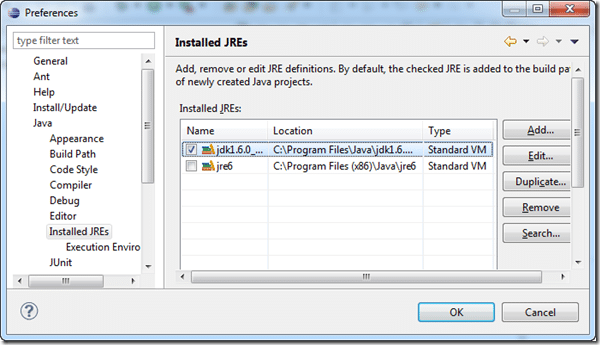
This will bring you back to the installed JRE’s window, unclick the JRE and click your newly added JDK, like this:
And voila! you are now configured to properly use the JDK instead of the JRE in Eclipse. So if you run into the error saying tools.jar is missing and you are using Eclipse, this is probably the problem.
If you launch Eclipse from the command line or via a shortcut, you can also set this value using the –vm command line setting, simply type:
eclipse.exe –vm c:pathtojdkbinjavaw.exe


