In the prior tutorial we got a simple top down tile map working. Now we want to add some character to it, literally. Depending on your needs this can be laughably simple or somewhat complex. Let’s take a look at a basic example. This is building on our previous code example and if you’ve worked through the prior tutorials in this series, there is nothing new here yet.
package com.gamefromscratch;

import com.badlogic.gdx.ApplicationAdapter;
import com.badlogic.gdx.Gdx;
import com.badlogic.gdx.Input;
import com.badlogic.gdx.InputProcessor;
import com.badlogic.gdx.graphics.GL20;
import com.badlogic.gdx.graphics.OrthographicCamera;
import com.badlogic.gdx.graphics.Texture;
import com.badlogic.gdx.graphics.g2d.Sprite;
import com.badlogic.gdx.graphics.g2d.SpriteBatch;
import com.badlogic.gdx.maps.tiled.TiledMap;
import com.badlogic.gdx.maps.tiled.TiledMapRenderer;
import com.badlogic.gdx.maps.tiled.TmxMapLoader;
import com.badlogic.gdx.maps.tiled.renderers.OrthogonalTiledMapRenderer;

public class TiledTest extends ApplicationAdapter implements InputProcessor {
    Texture img;
    TiledMap tiledMap;
    OrthographicCamera camera;
    TiledMapRenderer tiledMapRenderer;
    SpriteBatch sb;
    Texture texture;
    Sprite sprite;

    @Override public void create () {
        float w = Gdx.graphics.getWidth();
        float h = Gdx.graphics.getHeight();

        camera = new OrthographicCamera();
        camera.setToOrtho(false,w,h);
        camera.update();
        tiledMap = new TmxMapLoader().load("MyCrappyMap.tmx");
        tiledMapRenderer = new OrthogonalTiledMapRenderer(tiledMap);
        Gdx.input.setInputProcessor(this);

        sb = new SpriteBatch();
        texture = new Texture(Gdx.files.internal("pik.png"));
        sprite = new Sprite(texture);
    }

    @Override public void render () {
        Gdx.gl.glClearColor(1, 0, 0, 1);
        Gdx.gl.glBlendFunc(GL20.GL_SRC_ALPHA, GL20.GL_ONE_MINUS_SRC_ALPHA);
        Gdx.gl.glClear(GL20.GL_COLOR_BUFFER_BIT);
        camera.update();
        tiledMapRenderer.setView(camera);
        tiledMapRenderer.render();
        sb.begin();
        sprite.draw(sb);
        sb.end();
    }

    @Override public boolean keyDown(int keycode) {
        return false;
    }

    @Override public boolean keyUp(int keycode) {
        if(keycode == Input.Keys.LEFT)
            camera.translate(-32,0);
        if(keycode == Input.Keys.RIGHT)
            camera.translate(32,0);
        if(keycode == Input.Keys.UP)
            camera.translate(0,-32);
        if(keycode == Input.Keys.DOWN)
            camera.translate(0,32);
        if(keycode == Input.Keys.NUM_1)
            tiledMap.getLayers().get(0).setVisible(!tiledMap.getLayers().get(0).isVisible());
        if(keycode == Input.Keys.NUM_2)
            tiledMap.getLayers().get(1).setVisible(!tiledMap.getLayers().get(1).isVisible());
        return false;
    }

    @Override public boolean keyTyped(char character) {

        return false;
    }

    @Override public boolean touchDown(int screenX, int screenY, int pointer, int button) {
        return false;
    }

    @Override public boolean touchUp(int screenX, int screenY, int pointer, int button) {
        return false;
    }

    @Override public boolean touchDragged(int screenX, int screenY, int pointer) {
        return false;
    }

    @Override public boolean mouseMoved(int screenX, int screenY) {
        return false;
    }

    @Override public boolean scrolled(int amount) {
        return false;
    }
}
So what exactly did we do? Well first off, we added this sprite to the project in the android/asset folder.

It might look somewhat familiar…
In create() we allocate a sprite batch, load our texture and create a sprite with it. Finally in render() after the map is drawn, we simply draw our sprite to the batch. Order is of critical importance. One other thing I should probably point out… I don’t dispose() of anything, so this code leaks like mad… Now if you run the code you see:
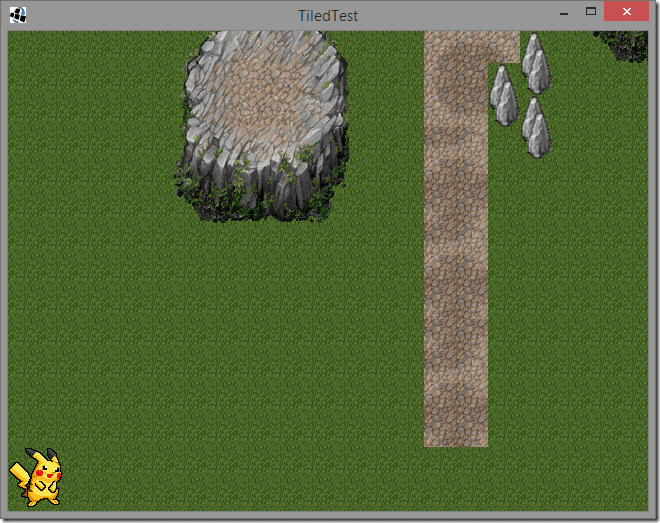
So far so good!
First problem we’ve got here is, how do we position our sprite within the world? In this case I am simply drawing at the origin, but how would we go about positioning the sprite in the tile a user clicks? Let’s go ahead and see!
Add the following to the touchDown handler:
public boolean touchDown(int screenX, int screenY, int pointer, int button) {
    Vector3 clickCoordinates = new Vector3(screenX,screenY,0);
    Vector3 position = camera.unproject(clickCoordinates);
    sprite.setPosition(position.x, position.y);
    return true;
}
Now we need to make a small change to our sprite batch. We need to apply our camera transformations to it, so when we scroll the screen around using the arrow keys, our sprite stays put. This is easily accomplished in render():
public void render () {
    Gdx.gl.glClearColor(1, 0, 0, 1);
    Gdx.gl.glBlendFunc(GL20.GL_SRC_ALPHA, GL20.GL_ONE_MINUS_SRC_ALPHA);
    Gdx.gl.glClear(GL20.GL_COLOR_BUFFER_BIT);
    camera.update();
    tiledMapRenderer.setView(camera);
    tiledMapRenderer.render();
    sb.setProjectionMatrix(camera.combined);
    sb.begin();
    sprite.draw(sb);
    sb.end();
}
Now when you run it, the sprite will draw where you click in the world:
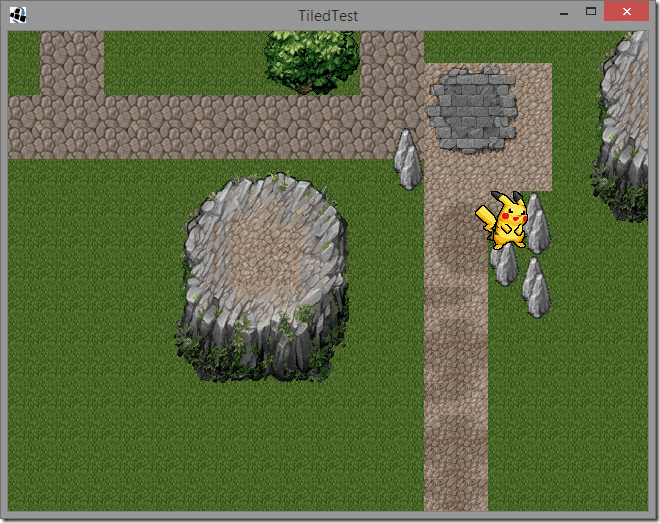
There’s a small possible problem here… what if you wanted your sprite to be BEHIND those rocks, or items in the higher level layers?
There are a couple of ways to do this. First you could actually create a layer for player sprites. You could simply create a layer in Tiled that you kept empty and add your sprite into it. Here instead I am going to do so programmatically. Let me make something perfectly clear, this is most certainly *NOT* how you would do it, but it does give an interesting bit of insight into how tiles and layers are composed.
public void create () {
    float w = Gdx.graphics.getWidth();
    float h = Gdx.graphics.getHeight();

    camera = new OrthographicCamera();
    camera.setToOrtho(false,w,h);
    camera.update();
    tiledMap = new TmxMapLoader().load("MyCrappyMap.tmx");
    tiledMapRenderer = new OrthogonalTiledMapRenderer(tiledMap);
    Gdx.input.setInputProcessor(this);

    sb = new SpriteBatch();
    texture = new Texture(Gdx.files.internal("pik.png"));
    sprite = new Sprite(texture);


    // Get the width and height of our maps
    // Then halve it, as our sprites are 64x64 not 32x32 that our map is made of
    int mapWidth = tiledMap.getProperties().get("width",Integer.class)/2;
    int mapHeight = tiledMap.getProperties().get("height",Integer.class)/2;

    // Create a new map layer
    TiledMapTileLayer tileLayer = new TiledMapTileLayer(mapWidth,mapHeight,64,64);

    // Create a cell(tile) to add to the layer
    TiledMapTileLayer.Cell cell = new TiledMapTileLayer.Cell();

    // The sprite/tilesheet behind our new layer is a single image (our sprite)
    // Create a TextureRegion that is the entire size of our texture
    TextureRegion textureRegion = new TextureRegion(texture,64,64);

    // Now set the graphic for our cell to our newly created region
    cell.setTile(new StaticTiledMapTile(textureRegion));

    // Now set the cell at position 4,10 ( 8,20 in map coordinates ).  This is the position of a tree
    // Relative to 0,0 in our map which is the bottom left corner
    tileLayer.setCell(4,10,cell);

    // Ok, I admit, this part is a gross hack.
    // Get the current top most layer from the map and store it
    MapLayer tempLayer = tiledMap.getLayers().get(tiledMap.getLayers().getCount()-1);
    // Now remove it
    tiledMap.getLayers().remove(tiledMap.getLayers().getCount()-1);
    // Now add our newly created layer
    tiledMap.getLayers().add(tileLayer);
    // Now add it back, now our new layer is not the top most one.
    tiledMap.getLayers().add(tempLayer);
}
And look, we are behind a tree!
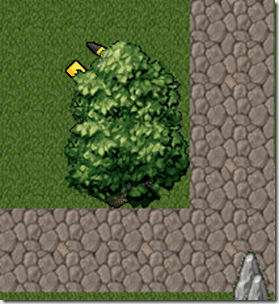
The comments explain it all really. We basically are programmatically creating a new Tile Layer within the map and positioning it below the top most layer. You would never do it this way for a sprite for several reasons. First you will only be able to move in cell by cell chunks ( aka, 64 pixels at a time ). In certain maps that makes sense, like old school Ultima 4 type role playing games. Next, to move you actually will have to remove the tile from it’s current location and add it to the new one. Finally, it’s probably pretty slow to boot. However if you want to dynamically populate a layer, say with power ups or things you create programmatically instead of using the level editor, this is how you can do it.
What about when dealing with the players sprite and moving it only a few pixels at a time? Well that’s slightly more complicated.
One option you have, especially if you want to use the Sprite class, is to extend the map rendering class, in this case OrthogonalTiledMapRenderer then override the render method and render your sprite(s). Here is a simple example:
package com.gamefromscratch;

import com.badlogic.gdx.graphics.g2d.Sprite;
import com.badlogic.gdx.maps.MapLayer;
import com.badlogic.gdx.maps.MapObject;
import com.badlogic.gdx.maps.tiled.TiledMap;
import com.badlogic.gdx.maps.tiled.TiledMapTileLayer;
import com.badlogic.gdx.maps.tiled.renderers.OrthogonalTiledMapRenderer;

import java.util.ArrayList;
import java.util.List;

public class OrthogonalTiledMapRendererWithSprites extends OrthogonalTiledMapRenderer {
    private Sprite sprite;
    private List<Sprite> sprites;
    private int drawSpritesAfterLayer = 1;

    public OrthogonalTiledMapRendererWithSprites(TiledMap map) {
        super(map);
        sprites = new ArrayList<Sprite>();
    }

    public void addSprite(Sprite sprite){
        sprites.add(sprite);
    }

    @Override
    public void render() {
        beginRender();
        int currentLayer = 0;
        for (MapLayer layer : map.getLayers()) {
            if (layer.isVisible()) {
                if (layer instanceof TiledMapTileLayer) {
                    renderTileLayer((TiledMapTileLayer)layer);
                    currentLayer++;
                    if(currentLayer == drawSpritesAfterLayer){
                        for(Sprite sprite : sprites)
                            sprite.draw(this.getSpriteBatch());
                    }
                } else {
                    for (MapObject object : layer.getObjects()) {
                        renderObject(object);
                    }
                }
            }
        }
        endRender();
    }
}
Now we simply use it in place of the other TileMapRenderer. Not now that we no longer need a SpriteBatch, since we are using the map renderer’s. Here’s the updated code:
package com.gamefromscratch;

import com.badlogic.gdx.ApplicationAdapter;
import com.badlogic.gdx.Gdx;
import com.badlogic.gdx.Input;
import com.badlogic.gdx.InputProcessor;
import com.badlogic.gdx.graphics.GL20;
import com.badlogic.gdx.graphics.OrthographicCamera;
import com.badlogic.gdx.graphics.Texture;
import com.badlogic.gdx.graphics.g2d.Sprite;
import com.badlogic.gdx.graphics.g2d.SpriteBatch;
import com.badlogic.gdx.maps.tiled.TiledMap;
import com.badlogic.gdx.maps.tiled.TmxMapLoader;
import com.badlogic.gdx.math.Vector3;

public class TiledTest extends ApplicationAdapter implements InputProcessor {
    Texture img;
    TiledMap tiledMap;
    OrthographicCamera camera;
    OrthogonalTiledMapRendererWithSprites tiledMapRenderer;
    Texture texture;
    Sprite sprite;

    @Override
    public void create () {
        float w = Gdx.graphics.getWidth();
        float h = Gdx.graphics.getHeight();

        camera = new OrthographicCamera();
        camera.setToOrtho(false,w,h);
        camera.update();

        texture = new Texture(Gdx.files.internal("pik.png"));
        sprite = new Sprite(texture);

        tiledMap = new TmxMapLoader().load("MyCrappyMap.tmx");
        tiledMapRenderer = new OrthogonalTiledMapRendererWithSprites(tiledMap);
        tiledMapRenderer.addSprite(sprite);
        Gdx.input.setInputProcessor(this);
    }

    @Override
    public void render () {
        Gdx.gl.glClearColor(1, 0, 0, 1);
        Gdx.gl.glBlendFunc(GL20.GL_SRC_ALPHA, GL20.GL_ONE_MINUS_SRC_ALPHA);
        Gdx.gl.glClear(GL20.GL_COLOR_BUFFER_BIT);
        camera.update();
        tiledMapRenderer.setView(camera);
        tiledMapRenderer.render();
    }

    @Override
    public boolean keyDown(int keycode) {
        return false;
    }

    @Override
    public boolean keyUp(int keycode) {
        if(keycode == Input.Keys.LEFT)
            camera.translate(-32,0);
        if(keycode == Input.Keys.RIGHT)
            camera.translate(32,0);
        if(keycode == Input.Keys.UP)
            camera.translate(0,-32);
        if(keycode == Input.Keys.DOWN)
            camera.translate(0,32);
        if(keycode == Input.Keys.NUM_1)
            tiledMap.getLayers().get(0).setVisible(!tiledMap.getLayers().get(0).isVisible());
        if(keycode == Input.Keys.NUM_2)
            tiledMap.getLayers().get(1).setVisible(!tiledMap.getLayers().get(1).isVisible());
        return false;
    }

    @Override
    public boolean keyTyped(char character) {

        return false;
    }

    @Override
    public boolean touchDown(int screenX, int screenY, int pointer, int button) {
        Vector3 clickCoordinates = new Vector3(screenX,screenY,0);
        Vector3 position = camera.unproject(clickCoordinates);
        sprite.setPosition(position.x, position.y);
        return true;
    }

    @Override
    public boolean touchUp(int screenX, int screenY, int pointer, int button) {
        return false;
    }

    @Override
    public boolean touchDragged(int screenX, int screenY, int pointer) {
        return false;
    }

    @Override
    public boolean mouseMoved(int screenX, int screenY) {
        return false;
    }

    @Override
    public boolean scrolled(int amount) {
        return false;
    }
}
Now when you run it, where you click the player sprite will be positioned correctly and behind objects:
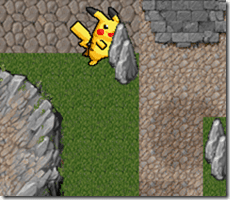
.
Under this system however, you just treat your sprite normally. Update it’s position and it’s updated in the game world.
There is one other possible way to support this functionality, that is a bit of a hybrid of both approaches. Like the earlier example, we add a new layer in to the map, in this case we are going to do it in Tiled instead of programmatically.
In Tiled, create a new object layer and position it like so:
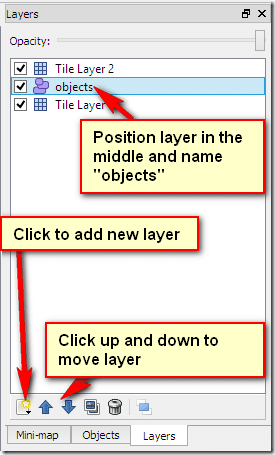
Now we are going to access it using the MapObject class, specifically the TextureMapObject ( a somewhat confusingly named class… ). Once again this requires a custom TileRenderer implementation, this time overriding the renderObject class, like so:
package com.gamefromscratch;

import com.badlogic.gdx.maps.MapObject;
import com.badlogic.gdx.maps.objects.TextureMapObject;
import com.badlogic.gdx.maps.tiled.TiledMap;
import com.badlogic.gdx.maps.tiled.renderers.OrthogonalTiledMapRenderer;

public class OrthogonalTiledMapRendererWithSprites extends OrthogonalTiledMapRenderer {

    public OrthogonalTiledMapRendererWithSprites(TiledMap map) {
        super(map);
    }

    @Override
    public void renderObject(MapObject object) {
        if(object instanceof TextureMapObject) {
            TextureMapObject textureObj = (TextureMapObject) object;
                spriteBatch.draw(textureObj.getTextureRegion(), textureObj.getX(), textureObj.getY());
        }
    }
}
renderObject() is called to render the various well… MapObjects in the tilemap. The default implementation is empty, so we need to provide one. Here we simply check to see if our object is a TextureMapObject and if it is we draw it using the spriteBatch, much like before.
A side effect is we no longer use the Sprite class for positioning. Instead we create a TextureRegion again and control position via the TextureMapObject setX/setY methods. Let’s take a look at the result on our main application:
package com.gamefromscratch;

import com.badlogic.gdx.ApplicationAdapter;
import com.badlogic.gdx.Gdx;
import com.badlogic.gdx.Input;
import com.badlogic.gdx.InputProcessor;
import com.badlogic.gdx.graphics.GL20;
import com.badlogic.gdx.graphics.OrthographicCamera;
import com.badlogic.gdx.graphics.Texture;
import com.badlogic.gdx.graphics.g2d.Sprite;
import com.badlogic.gdx.graphics.g2d.SpriteBatch;
import com.badlogic.gdx.graphics.g2d.TextureRegion;
import com.badlogic.gdx.maps.MapLayer;
import com.badlogic.gdx.maps.objects.TextureMapObject;
import com.badlogic.gdx.maps.tiled.TiledMap;
import com.badlogic.gdx.maps.tiled.TiledMapRenderer;
import com.badlogic.gdx.maps.tiled.TmxMapLoader;

import com.badlogic.gdx.math.Vector3;

public class TiledTest extends ApplicationAdapter implements InputProcessor {
    Texture img;
    TiledMap tiledMap;
    OrthographicCamera camera;
    TiledMapRenderer tiledMapRenderer;
    SpriteBatch sb;
    Texture texture;
    Sprite sprite;
    MapLayer objectLayer;

    TextureRegion textureRegion;

    @Override
    public void create () {
        float w = Gdx.graphics.getWidth();
        float h = Gdx.graphics.getHeight();

        camera = new OrthographicCamera();
        camera.setToOrtho(false,w,h);
        camera.update();
        tiledMap = new TmxMapLoader().load("MyCrappyMap.tmx");
        tiledMapRenderer = new OrthogonalTiledMapRendererWithSprites(tiledMap);
        Gdx.input.setInputProcessor(this);
        texture = new Texture(Gdx.files.internal("pik.png"));

        objectLayer = tiledMap.getLayers().get("objects");
        textureRegion = new TextureRegion(texture,64,64);

        TextureMapObject tmo = new TextureMapObject(textureRegion);
        tmo.setX(0);
        tmo.setY(0);
        objectLayer.getObjects().add(tmo);
    }

    @Override
    public void render () {
        Gdx.gl.glClearColor(1, 0, 0, 1);
        Gdx.gl.glBlendFunc(GL20.GL_SRC_ALPHA, GL20.GL_ONE_MINUS_SRC_ALPHA);
        Gdx.gl.glClear(GL20.GL_COLOR_BUFFER_BIT);
        camera.update();
        tiledMapRenderer.setView(camera);
        tiledMapRenderer.render();
    }

    @Override
    public boolean keyDown(int keycode) {
        return false;
    }

    @Override
    public boolean keyUp(int keycode) {
        if(keycode == Input.Keys.LEFT)
            camera.translate(-32,0);
        if(keycode == Input.Keys.RIGHT)
            camera.translate(32,0);
        if(keycode == Input.Keys.UP)
            camera.translate(0,-32);
        if(keycode == Input.Keys.DOWN)
            camera.translate(0,32);
        if(keycode == Input.Keys.NUM_1)
            tiledMap.getLayers().get(0).setVisible(!tiledMap.getLayers().get(0).isVisible());
        if(keycode == Input.Keys.NUM_2)
            tiledMap.getLayers().get(1).setVisible(!tiledMap.getLayers().get(1).isVisible());
        return false;
    }

    @Override
    public boolean keyTyped(char character) {

        return false;
    }

    @Override
    public boolean touchDown(int screenX, int screenY, int pointer, int button) {
        Vector3 clickCoordinates = new Vector3(screenX,screenY,0);
        Vector3 position = camera.unproject(clickCoordinates);
        TextureMapObject character = (TextureMapObject)tiledMap.getLayers().get("objects").getObjects().get(0);
        character.setX((float)position.x);
        character.setY((float)position.y);
        return true;
    }

    @Override
    public boolean touchUp(int screenX, int screenY, int pointer, int button) {
        return false;
    }

    @Override
    public boolean touchDragged(int screenX, int screenY, int pointer) {
        return false;
    }

    @Override
    public boolean mouseMoved(int screenX, int screenY) {
        return false;
    }

    @Override
    public boolean scrolled(int amount) {
        return false;
    }
}
It’s mostly the same, except of course the different renderer, the fact we no longer use a Sprite object and in touchDown() we locate the TextureMapObject in the “objects” layer and update its positions.
Which method you use is up to you, your personal preference and the requirements of your game. Myself, I find the second to be probably the most clean. Of course if your sprite doesn’t need to care about tile depth at all, you can ignore all of this and just use SpriteBatch over top and save yourself many headaches!
