
One area of Blender that is often over looked, or people are downright unaware of, is its video editing capabilities. Hidden behind the 3D functionality we all know and love, under a layer of yes… sometimes confusing UI, lives a remarkably capable NLE ( non-linear editor ).
In this tutorial I am going to look at some of the simples and most common features Blender offers when it comes to video editing. We are going to look at a couple extremely common tasks, and how you would accomplish them using Blender. Without further ado, let’s jump right in.
Setting Blender up for video editing
The first step is to fire up Blender. I personally am using Blender 2.63, but any version after 2.5x should follow more or less the same steps. NLE functionality was also available in 2.4, but the UI has changed extensively.
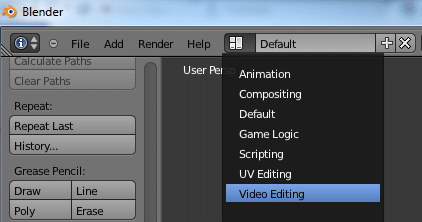
Once in Blender, click the Choose Screen Layout button and select Video Editing in the dropdown, like this:
Your Blender should change to the following layout:
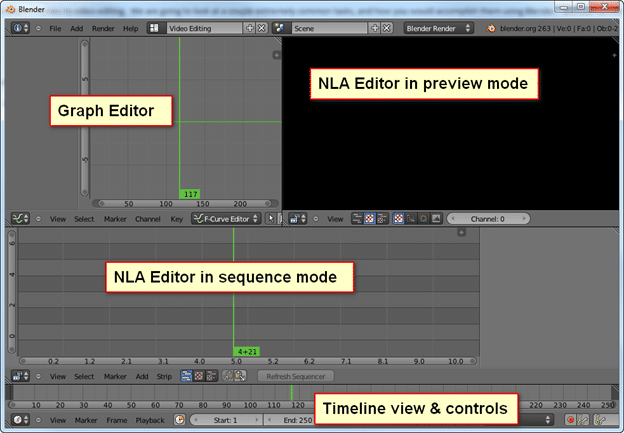
The NLA editor sequence area is where we add all of our video elements, such as video, audio and images. In the top right it is in preview mode ( they are both the same window types ), showing a preview of the video we are creating.
The timeline view is where your timeline controls are, as well as controls for setting keys, video duration etc.
The graph editor is for fine tune control using f curves and will not be used much in this tutorial.
Alright, we now are in editing mode, let’s start with something simple.
Adding a movie title screen
As is pretty common, we want to have a static “Title Screen” of sorts. In our case it is just a simple png image we are going to display for 5 seconds. We are recording at 30FPS, so that means 150 frames.
First we need to add an image. I created a 1920×1080 PNG image in GIMP for this. This is because I am working in 1080p output. Use whatever you wish.
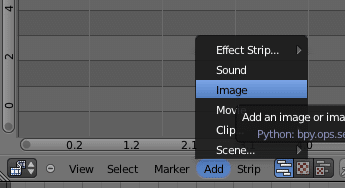
In the NLA Editor sequence window, locate the menu and choose Add Image:
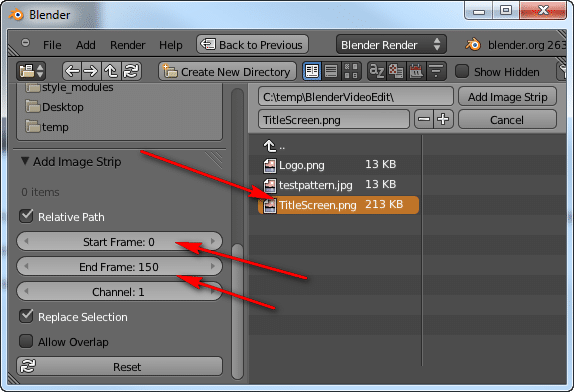
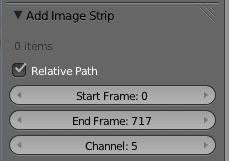
Locate the file you want as a title screen. In the left hand side, locate start frame and set it to 0, and end frame and set it to 150:
Finally click Add Image Strip. The image will now appear on Channel 1 of the NLA sequence, like such:
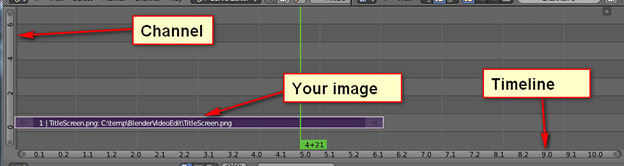
Let’s take a look at the key parts that make up the sequence window.
The left hand side, the vertical axis represents the different channels composing your video. In the crudest sense you can think of these like layers in a graphics program ( with obvious exceptions, such as the fact they can overlap, and contain sound ).
Across the bottom, the horizontal axis represents elapsed time.
Then in this case, the purple object represents your image. Different components have different colours as we will see. The length of this bar represents the duration that the image is visible in the timeline.
You can navigate this window using many familiar Blender hotkeys. The most important for now is G)rab to move the active item around. The middle mouse button pans around, while the scroll wheel zooms in and out. While the “.” Key zooms to fit the selection/sequence. With only a single channel, these two features aren’t really all that useful yet.
So, that’s the sequence view, but you should also notice at the top right corner, the other NLA window is showing an active preview, like so:
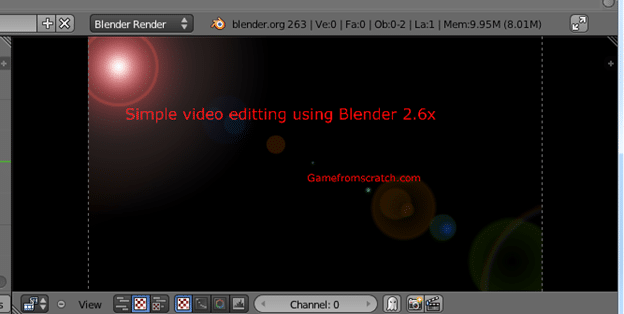
As you move from frame to frame, this area will update.
Alright, so we now have a title screen that displays for 5 seconds, lets add some video:
Adding a video
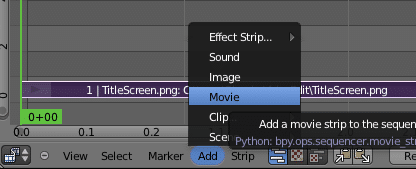
In the NLA Sequence view, click Add, then Movie.
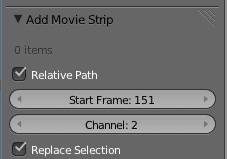
Just like before, select the movie file you want to add. Set the start frame to 151, and set channel as 2.
Now you will see the following results in the sequence:
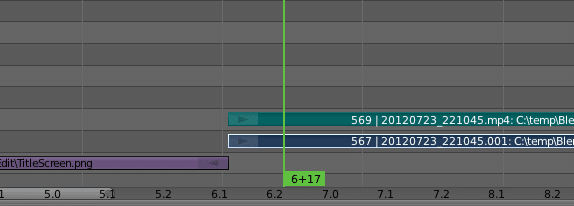
As you can see, the video starts right where the image ends. Depending on the video file you uploaded, you may have gotten two channels like I have… what is going on here? Well, the blue strip represents the video portion of the video file we added, while the green portion represents the audio track. In this case we want to keep the audio. If you didn’t, getting rid of it is as simple are right clicking it, then hitting X to delete. There is one potential problem though, the audio isn’t synced by default. Let’s correct that right away.
In the Timeline window, select Playback, and make sure AV-sync is selected.
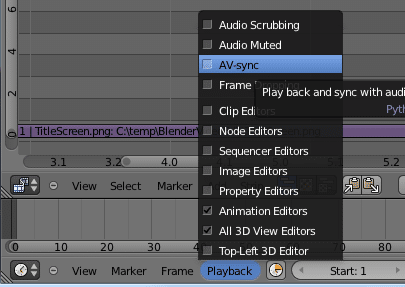
Now audio and video will be synchronized.
At this point, we have one other issue… Our newly added video may be longer than our timeline.
Right click your video in the NLA Sequence window and take a look in the properties to the right ( hit N if the properties Window isn’t visible. ). Locate the Length:
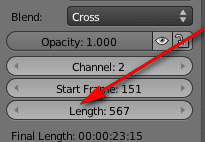
This added another 567 frames to our total length, for a total of 717 frames. We need to update our video length. In the timeline, locate End, click it in the middle and update to 717:
![]()
Now you can go ahead and preview your handy work up until this point. Just to the right of the end frame you just specified, are a set of VCR like controls:
![]()
The field to the left ( currently valued 191 ) represents the current frame, while the buttons are for controlling playback. The preview window at the top right should update as you got from frame to frame.
Now we have a title screen and a movie with audio, synced and playing back. Let’s look at one of the next most common tasks…
Adding a watermark
Adding a watermark or signature to a video is one of the most common tasks you need to perform when editing a video, and fortunately it is remarkably simple. In fact, it works exactly the same as when we added the title screen. All we are doing is adding a mostly transparent image over top of our scene for the entire duration of the film. Create a 1080p image in whatever image editor you prefer, just make sure everywhere except your watermark is transparent. I used this image:

Nothing really exciting. Just like when we added the title screen, in the NLA Editor window, select Add->Image, select your file. On the left hand side we want it to start at Frame 0, go until Frame 717 and be on channel 4, like so:
If you look in your preview window, it probably just went all black except the watermark, like so:
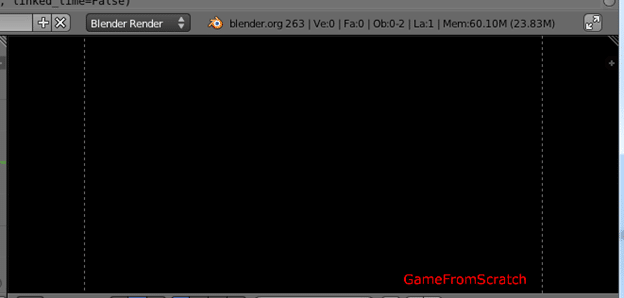
This is because the image is obscuring the strips below. Don’t worry, this is easily fixed.
In the NLA Editor sequence, make sure the watermark image is selected by right clicking it, then in the properties window ( hit N if not visible ), select the Blend drop down and choose Alpha Over, like so:
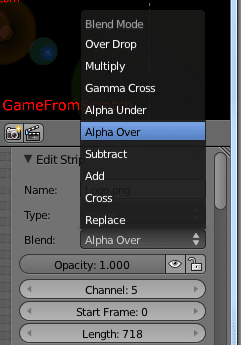
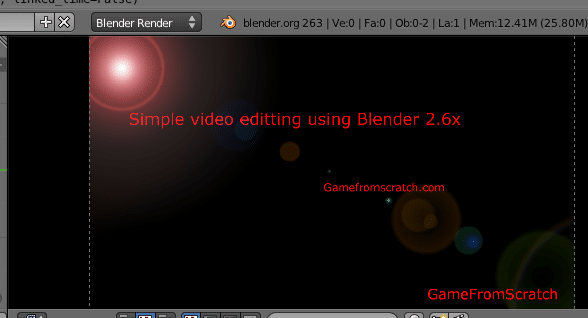
Then voila, in your preview Window everything is back to normal, just now with a watermark in the bottom right corner!
This process thus far assumed that your video was perfect and continuous, something that is rarely true. So now we look at…
Editing a video clip
Just like back in the days of physical film, cutting up and reordering video is a remarkably common task. Fortunately it is also quite easy. We are now going to split our image in half, and put an interruption in the between the splice.
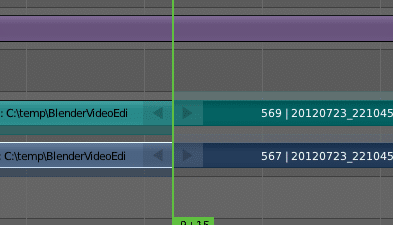
First thing you want to do is select the point where you want to make the cut. You can do this using the vcr style controls, by left clicking anywhere in the timeline, left clicking anywhere on the VLA Editor sequence, or directly entering a frame in the current frame box. The green line indicates the currently selected frame:
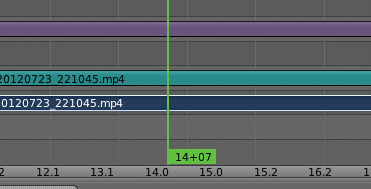
Once you have your video where you want to perform the cut, hold down SHIFT and right click both the video and audio portions of the video strip ( the blue and emerald bars ). With both selected, hit ‘K’ to perform a hard cut. At this point, you have essentially “cut” the film and audio tracks into two separate entities.
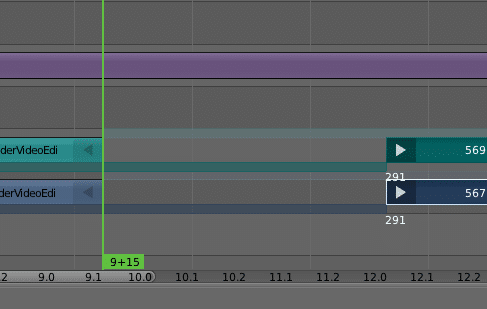
Let’s put a pause of 60 frames ( 2 seconds ) in between our cut. SHIFT select the audio and video strip on the right, press G to move them and move them 60 frames to the right, like so:
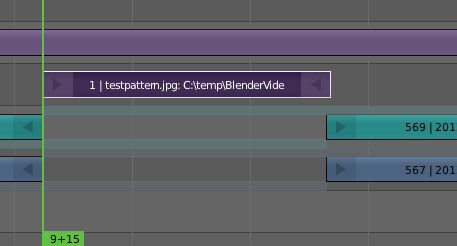
Now let’s insert an image to be displayed during the gap. Using the same method we did before, add an image. In my case I want it to start at frame 231, end at frame 291 and be added on channel 4, like such:
Now if you play the video you will have a 2 second pause in both video and audio, while your image is displayed.
We are getting to the end, now let’s add a simple effect. Let’s fade our video to black over the final 160 frames.
Adding a video effect
We now want to select 100 frames from the end of our video. The easiest way to do this is probably in the timeline, although it is still only going up to 250! To resize the timeline to show our entire timeline either select View->View All, or hit the Home key. You will see the timeline now goes all the way up to 720, now left click around the 620 mark. This will move the current frame to 620, in the timeline, the VLA Editor window and in the current frame box:

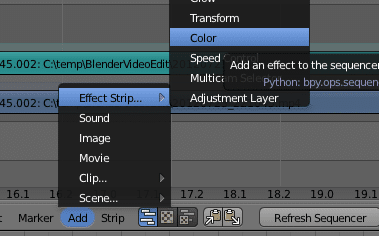
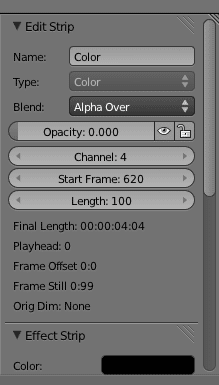
Right click the video strip ( the blue one ), then choose Add->Effect->Color
In the properties window, make sure the resulting effect starts at 620 and has duration of 100. We then want to set the opacity to 0 ( making it completely transparent ), set Blend to Alpha Over like this:
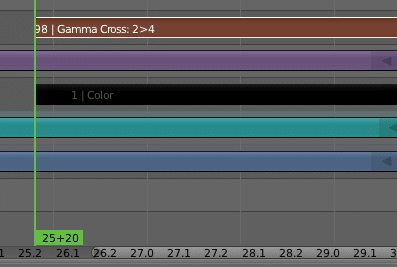
Now in order, SHIFT Click first the video strip, then the color strip we just add, then select Add->Effect Strip->Gamma Cross. This will add another effect the results in the color getting slowly drawn over the movie. In the sequence it will appear like:
We now have a ( rather crappy ) fad to black to end our film.
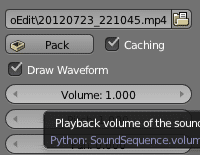
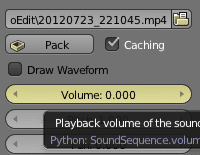
Finally, lets fade out our audio file. In the timeline, move to around the 560 frame mark. In the properties window ( N if not on screen ), scroll down and hover over the volume button, like so:
Hit the “I” key. This will set a keyframe. The keyframed value ( volume ) will turn yellow:
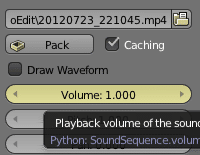
Now we want to advance to the end of our sequence (frame 720 for me), and this time change the value to 0, and set another keyframe. Like so:
Now if you look in the graph editor window ( which has been collecting dust until now ), you can see a curve representing the audio falloff we just set:
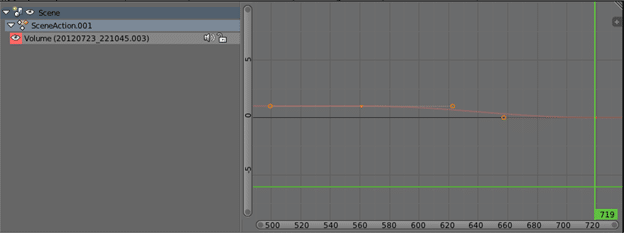
You can control the rate the audio drops off by manipulating this curve. We however are going to leave it as it is.
And sometimes… you encounter a bug. After cutting the audio strip, I was unable to keyframe the second portion of the audio strip. It gives the error:
Could not insert keyframe, as RNA Path is invalid for the given ID (ID = SCScene, Path = sequence_editor.sequences_all[“20120723_221045.002”].volume)
It is annoying, but easily fixed. Right click select the strip causing the problem, then select the menu Strip->Duplicate Strip. Now delete the original ( X ), and move your duplicate in it’s place. Keyframing should now work again.
And we are now complete with the editing, let’s go ahead and render it. This is where the Blender UI kind of falls on it’s face, as this process is nowhere near as intuitive as it should be!
Rendering your video to file
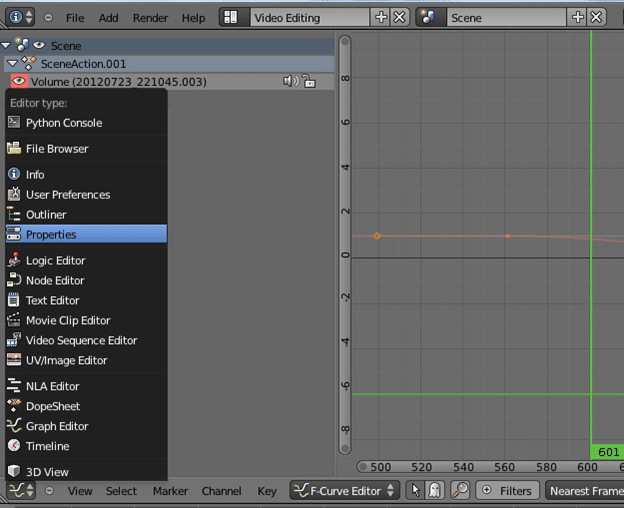
First thing, we need to open up the Properties view. We can either open up a new Window, or repurpose an existing one. Since we aren’t really using the graph editor, I am going to repurpose it. Click the window type icon and select Properties, like so:
First thing we want to do is set up our dimensions. Since we are outputting at 1080p, lets start with that default. Drop down the dimensions and pick HDTV 1080p.

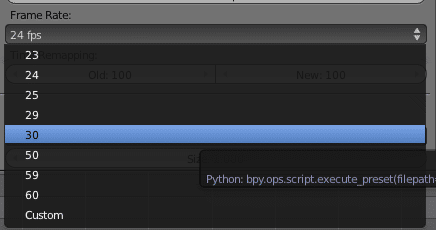
In my case though, my source video ( and desired output ) is actually 30FPS, not 24. So lets change that next. Drop down FrameRate and select 30:
Now scroll down to the Output section, choose your output location and output format:
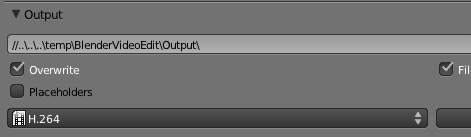

I am going with H.264 for this example.
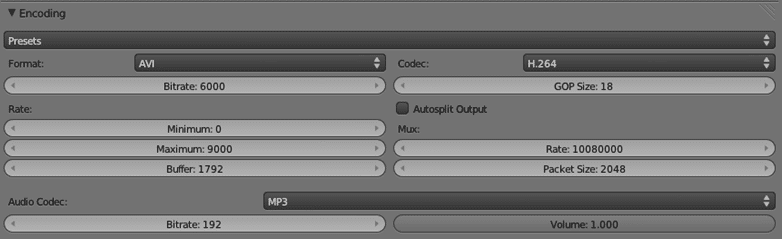
Now scroll down and expand the encoding section. This part will be entirely dependent on your computer, the codecs you have installed as well as your desired results. I ultimately will be uploading to Youtube or Vimeo, who will both re-encode anyways, so I am going to encode at a fairly high level. The Bitrate is what will determine file size vs quality. Also by default it will not encode audio, so make sure you select an audio codec if you want your audio encoded. If you select an audio codec that isn’t compatible with your video codec, it will give you an error when you try to render. Here are the settings I’ve used.
Now we are finally ready to output our video file. Scroll back up and click the Animation button:

And now Blender will churn off for a period of time creating your movie. If you are running Windows 7, a progress bar will update over the Blender application icon. You can press ESC to cancel the render at any time.