This part is sadly rather dull, there will be absolutely no coding but it is a necessary evil. In this part, we are going to configure your development environment to work with SFML. If you already know all about how to set Visual Studio up, or are working in a different IDE, feel free to skip to the next part.
One thing to be aware of before we start. You will find these instructions vary from what you see in many other tutorials and there is one very good reason for that. Most tutorials configure your IDE settings globally, so the settings you change will affect every project you ever create. Myself, I configure on the project level whenever possible. This has the downside of requiring you to do this configuration again and again ever time you create a new project. However, what it does allow is for anyone that downloads the project to automatically have the correct settings. Also, it seems cleaner to me to only link to libraries when you actually need them. As an upside to this, if you download the project from here, you don’t actually need to do any of this work! ( That said, you should still learn how! )
Alright, assuming you downloaded all the requisite files listed at the end of the last post, let’s get started. Warning, this is going to appear longer and a lot more daunting than it really is. I just went into a ton of detail because a small error in this step can lead to a very difficult process to discover the problem.
First off, fire up Microsoft Visual C++ Express 2010.
Selected the File –> New –> New Project… menu.
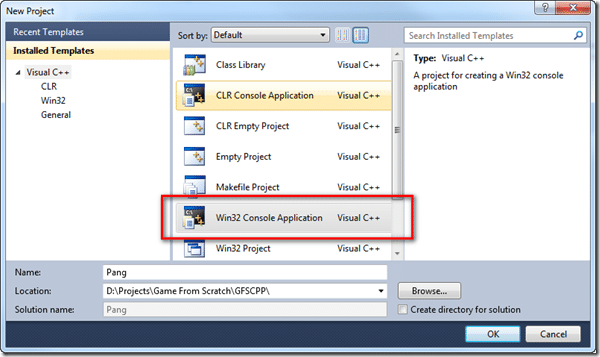
The following dialog will appear:
Select “Win32 Console Application”. Fill in the name, in this case, Pang ( which will automatically name the Solution the same thing ) and select a Location to save your project in. You can optionally uncheck “Create directory for solution”, which I always do when creating a single project solution file. If you don’t you will end up with a directory structure like C:PangPang. In the end, it doesn’t matter which you choose. Now click the OK button.
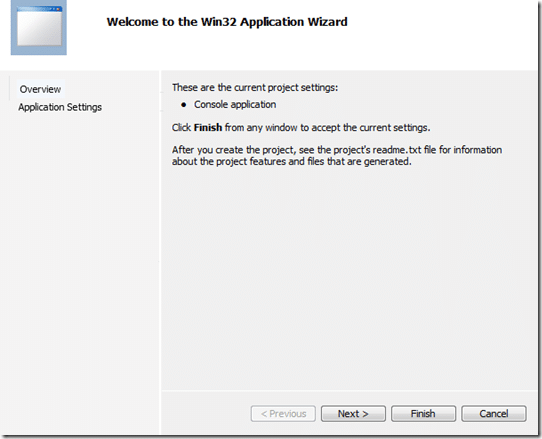
Now another dialog will pop-up:
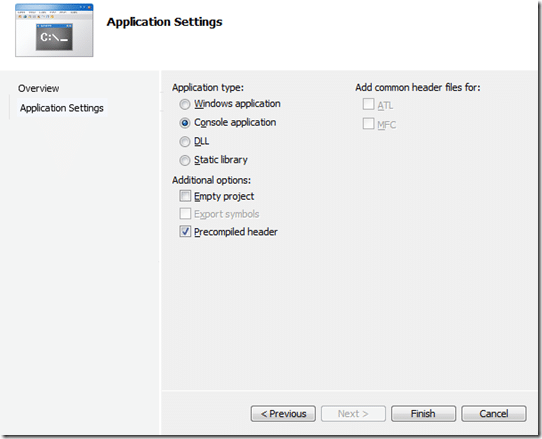
Simply click the Next button ( or Finish ). If you click Next it will lead you to this dialog:
For now, you can leave everything exactly as it is and just click Finish.
There are a few things to be aware of here. First is the Application Type: which you basically choose at the first step when you selected to create a Console Application. Ignore it for now. Next are the additional options. If you leave “Empty project” unchecked, which we are going to do, it simply creates a default cpp ( pang.cpp in this case ) with the programs main() defined. Finally, the Precompiled header checkbox is quite important, as this causes a file called StdAfx.cpp/StdAfx.h to be created which is the Microsoft way of supporting precompiled headers. We will cover precompiled headers later on, so for now leave it checked. Click the Finish button.
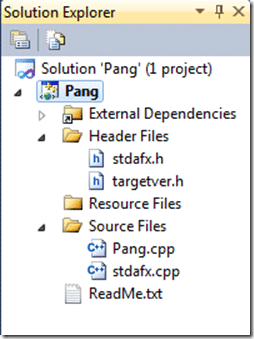
Once that is completed, Visual C++ will set up your project like this:
Now that this is created, we need to set up SFML to work with your newly created Project.
Before we continue there is one more thing to be aware of, Visual Studio created two things here, a Solution and a Project. When working inside the IDE, there is always one solution, but within a solution, you can have multiple projects. Recognizing the difference between a project and a solution is very important. In the Solution Explorer, this will illustrate the difference:
The vast majority of configurations changes we make will be on the project level. When I say “Right Click on the Project” this is where I mean for you to click.
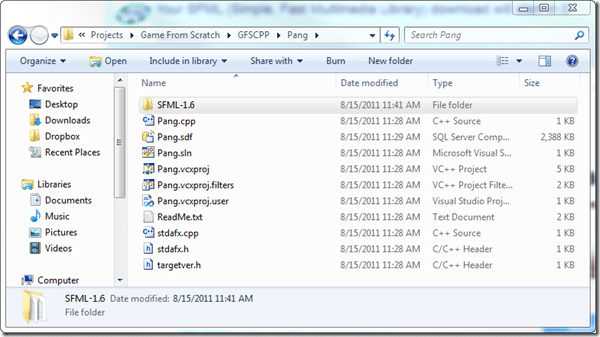
Alright, now open up the SFML-1.6-dev-windows.zip file we downloaded in the last part. If you do not have a good zip program, or aren’t using Vista/Windows 7 where it is built-in, I recommend downloading 7zip. From inside the archive copy the folder SFML-1.6 and paste it in your newly created solution directory. In the end, your directory should look something like this:
Now we need to configure Visual C++ to know where SFML-1.6 is.
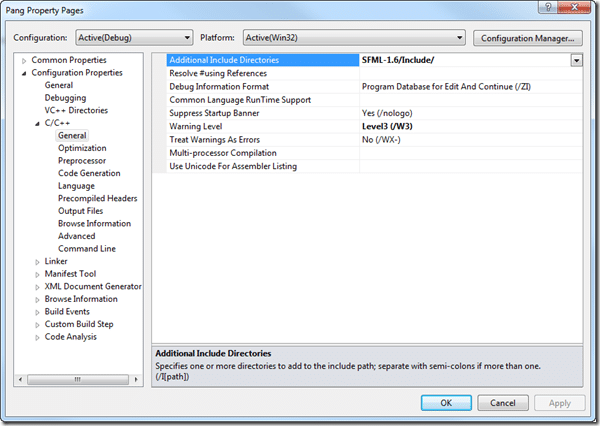
Right-click on the Project in Solution Explorer and choose “Properties”
In the left hand column, expand Configuration Properties –> C/C++ –> General and on the right in “Additional Include Directories” add “SFML-1.6/Include/” ( without quotes! ). It should look like this:
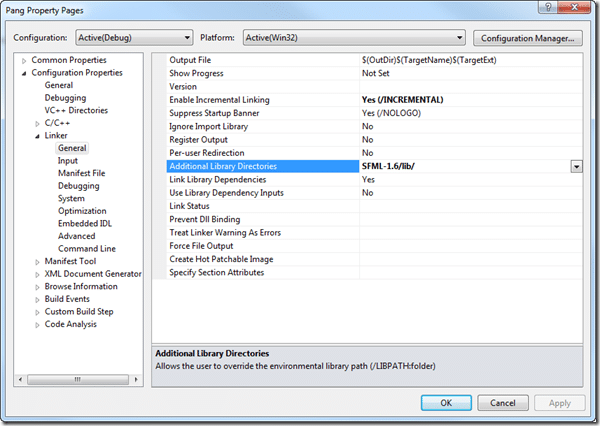
Now in the same Property Pages dialog, on the left hand side expand
Configuration Properties –> Linker –> General and in “Additional Library Directories” type “SFML-1.6/lib/” (again, no quotes!). Once completed, it should look like this:
Finally, in the same Property Pages dialog, on the left hand side expand
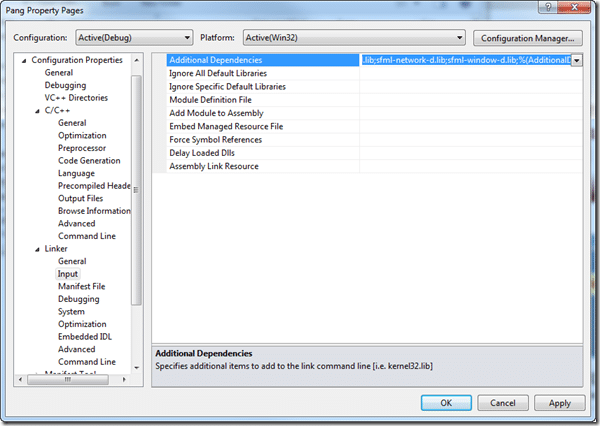
Configuration Properties –> Linker –> Input in the field “Additional Dependencies” at the end of the field before “(%AdditionalDependencies)”
insert:
“sfml-system-d.lib;sfml-main-d.lib;sfml-graphics-d.lib;sfml-audio-d.lib;sfml-network-d.lib;sfml-window-d.lib;”
Again, no quotes!.
In my case ( which should be pretty standard for a new install ), the entire value after editing is:
kernel32.lib;user32.lib;gdi32.lib;winspool.lib;comdlg32.lib;advapi32.lib;shell32.lib;ole32.lib;
oleaut32.lib;uuid.lib;odbc32.lib;odbccp32.lib;sfml-system-d.lib;sfml-main-d.lib;
sfml-graphics-d.lib;sfml-audio-d.lib;sfml-network-d.lib;sfml-window-d.lib;
%AdditionalDependencies)
Without any spaces or newlines of course. Once completed, it should look like this:
Finally, we are done with settings, click Apply then OK to close the dialog.
Your project is now 99% configured, only one step remains. When need to compile your project so that it will create the proper debug directories. In Visual C++, simply click this button or press F5.
Assuming everything went according to plan, you should now see:
If you don’t, something is configured wrong. Retrace these steps and if the error keeps occurring, paste it into the commends of this page and I will see if I can resolve it.
Now I swear we only have one step remaining! In the previous part, I got you to download a file called vs2010.zip. This file contains SFML binaries compiled to work with Visual C++ 2010. Open up the archive and copy the files:
- sfml-audio-d.dll
- sfml-graphics-d.dll
- sfml-main-d.lib
- sfml-network-d.dll
- sfml-system-d.dll
- sfml-window-d.dll
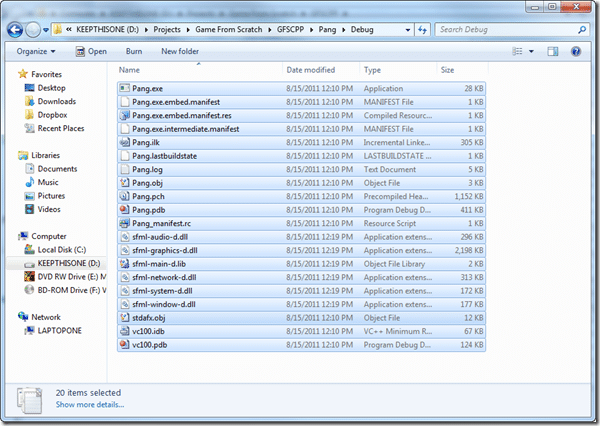
( basically, all files ending with –d.dll ) into the debug folder that was generated in your project directory. Your debug folder should now look something like this:
Now, we are done!
If you couldn’t follow along to that, or you get errors, you can download a fully configured solution here. Just download, unzip and double click pang.sln.
Alright, now that we have everything configured and working… on to the next section to write some code!
| Back to Introduction | Forward to Part 2 |

